This guest blog is written by Jake Sugden.
Most great photographs are great for a reason, they don’t just ‘happen’. You can improve your chances of making a great image:
- There are rules and conventions for creating ‘striking compositions’. Study good photographs and try to figure out ‘why they work?’, which ‘rules’ have the photographers employed?
- The ‘best photos’ are normally taken in ‘the best light’. Study light and how changes in weather and seasons affect its quality.
- If you don’t have a photographer’s eye then you can develop it with practice.
- Learn how to master your camera controls.
If you are planning to take a shot, let’s say, of a castle on a hill – whether that be for your own pleasure and social media or for a commercial shoot – then there are a number of things that you can do to increase the chances of getting a great shot. It’s important to have a good mental image of what the final image is going to look like.
There are a few photography considerations that you will need to think about when sitting down to plan the drone aspects of the shoot;
- What is the subject matter?
- Which angle is the best to shoot it from?
- Is it a close up or a wide shot?
- Where does the light need to be coming from to get the best shot?
- What is the best time of year/day to get the shot? You might have to revisit the same site multiple times.
- Do you want to avoid having people/vehicles in the shot?
- What composition are you trying to achieve – high or low, oblique or vertical?
Composition
The first thing we do, when we look through the viewfinder of a camera, is to move the camera around, zoom in and out, until we like what we see and settle on a ‘good composition’.
The viewfinder represents the frame, or the bounds, of the final image and everything we want to record needs to be contained within it. “So, where’s the difficulty in that?” you might ask.
The difficulty comes in knowing what to include in the frame, where to locate it in the frame, how much of the frame to fill with the subject matter, what to have in the background, where to have the light coming from, and so on. With aerial photography there are even more decisions to make as you can now move your camera around in space!
To help get you started there are some ‘rules’ to composition and these apply to all photography. These rules will help you assemble the components of your shot and give you a good chance of it working out. For aerial photography there are a few additional guides that will set you on your way to great photography.
Pro Tip Composition rules are ‘tricks of the trade’; they have been developed over many years based on evidence of what ‘looks pleasing to the eye’. Study photos that you like and see if you can work out which ‘rules’ they have employed.
The ‘Rule of Thirds’ is the classic compositional rule. Imagine your frame is divided into thirds, horizontally and vertically. Your frame now has nine boxes, and intersections where the dividing lines cross.
The rule states that you will achieve a pleasing composition if you place vertical and horizontal elements, of your image, along these lines and objects of interest on the intersections where they meet. This means that the subject matter is placed off-centre rather than occupying the middle of the frame.
Pro Tip Don’t include a lot of sky in your image unless the sky is the star of the show. Looking at a photo that is half sky, even if it is blue, isn’t very scintillating. If the sky is dramatic then drop the horizon onto the lower third line and make it a feature.
Leading Lines are lines in the image that ‘lead your eye’ naturally through the scene. Sometimes images can be a confusing array of components; using a ‘leading line’, whether it be a natural or man-made element in the image, can help make sense of the photograph.
Leading lines control exactly where you want the viewer to look within your image, where the important subject matter is.
Diagonals can add depth and a sense of movement to a shot. Rather than shoot a building, for example, straight on, where you’ll end up with a very ‘blocky’ image, if you shoot it obliquely, from a corner say, then you can add depth and perspective, and more interest.
Pro Tip I always try to include a strong diagonal element, or elements, in my aerial photos. Finding diagonals with a drone can be a lot easier than running around on the ground!
Depth is created by the juxtaposition of elements in the foreground and the background of your image. To add depth to your aerial compositions you should consider flying close to your subject matter, to a point where the foreground and backgrounds separate ie one looks close and the other far away. Don’t always shoot wide as your images could look flat and uninteresting, as the subject matter blends into the background. This is a particular problem with the standard wide lenses on most prosumer drones.
Pro Tip Using a zoom lens can help you achieve ‘depth’ in your images by separating the foreground from the background.
‘Top Down’ shots are the real signature of drone photography. Get your drone high and point the camera straight down to capture shots that you will never get from ground-based photography. Look for abstract shapes, patterns and shadows that leave the viewers puzzled and amazed.
Pro Tip Don’t overuse ‘top down’ shots as the novelty soon wears off and some images can be positively ‘vertigo-inducing’. ‘Top down’ shots of buildings are normally uninteresting as the viewer is faced with an image of gutters and air conditioning plant. Try flying at just on, or above, the roof-line for the most interesting shots.
Aerial photography gives you, the photographer, almost limitless compositional possibilities. Try to practice different compositions of the same subject by experimenting with:
- Distance from the subject – try near and far.
- The drone’s altitude – try low and high.
- The relative position – try left and right, and even behind, if you can.
Pro Tip If you are photographing a tall structure fly your drone to a point where the top of the structure protrudes above the horizon to give the image a sense of scale.
By experimenting you will at least have explored the compositional possibilities for that subject. Remember that you also have the tilt function with the gimbal as a new method of changing the composition of your shots.
Pro Tip When shooting an object or scene, get the shot, which you had pre-visualised, first. Then, as you have plenty of battery life left, fly around and experiment with different heights, distances and approaches. Some of my best shots are the ones that came from experimenting after I had taken what I thought was ‘the money shot’.
Rules Are Meant To Be Broken!
The beauty of modern digital photography, and post-production, is that it allows us endless possibilities. Experiment with the rules until you find out what works for you. When you have more confidence it is ok to go against convention and break the rules. Simply changing something like the crop aspect ratio, for example, can often be dramatic and completely transform a shot.
Remember that you can change many of the compositional elements of an image in ‘post’, like the aspect ratio, or horizon line, so it might be better to do your experimentation there rather than in camera. Always have that in mind when making an image.
Pro Tip Shoot slightly wider than you think you need to. Allow yourself space to crop, level horizons and correct verticals, in post-production, later.
Light
Above all else, there is one element that can make or break your image and that is the light. I don’t mean a correct technical exposure, but, the quality and quantity of the light in your scene; how it is lit and the direction it is lit from.
Pause a moment there…. This is something that we have no control over. We’re using a drone so we have to go with the light that there is and make the best of it, surely?
Of course, to some extent that is true. If we only have a fixed time slot to get the shot and we are constricted by safety, or other considerations to take off from a certain place, then, yes, we do have to make the best of what light there is. We get a good exposure, process it correctly and deliver it to our client or to social media. But the key word there was ‘IF’.
On the other hand, if we are NOT constrained by time, or other considerations, then surely we plan to take the shot when the best light is available for that subject – depending on what we pre-visualise or, perhaps, what a client demands.
So let’s look at how light can vary and how you can make use of it creatively.
The ‘Quality’ of the light is a term you will hear bandied about when discussing anything from wedding to landscape photography. What it means is the harshness, or the softness, of the light. The sun is a single-point source of light and when it is bright it gives a very harsh light with deep shadows, the wedding photographer’s nightmare. If the sun disappears behind a small white cloud, then momentarily, the shadows reduce, or disappear, and the light is said to ‘soften’. It has effectively been put behind a ‘diffuser’. Portrait photographers use diffusers and modifiers (known as soft-boxes) to increase the size of the light source (usually a flash) relative to their subjects, if they want to achieve a rich soft light in their shots.
The Direction of the light will have a significant effect on its quality. Pointing a camera directly into light will either throw your subject into shadow (silhouette) or ‘blow out’ the background exposure. Either way, you will find that the colour in the scene will vanish and you will be left with harsh tonal variations. Using light, obliquely, across a landscape will give it depth if you can achieve nice shadows, say later in the day or early in the morning. It will add detail to your scene and a pleasing tonal contrast. That said, you might want to try a shot into light and see how it looks…be prepared for drama.
Nighttime will offer you a transformational view of your scene. Sometimes the best ‘night’ light is actually found before it gets pitch black and there is still some definition in the sky. Try to avoid big black areas of darkness in your shots, as they will, most likely, add nothing to the quality of the overall image. Try to fill the image with light.
Pro Tip Generally speaking you can’t add your own light to a landscape, so look for locations where someone has done it for you. Floodlights and building lights tend to only be ‘on’ in the evening – don’t expect them to be lit at dawn.
About Jake Sugden
A former Naval Officer, Jake trained as a documentary photographer and is now one of the UK’s leading industrial photographers. Since founding his photographic businesses he has established a reputation for discretion and sensitivity, as well as producing compelling corporate and aerial images.
As an early adopter of drone technology, Jake has become one of its leading proponents and his book, featured below, has become an industry best-seller.
“I specialise in creating first-class photographic content for clients who require attention-grabbing images and a compelling visual story for their brand or organisation.”
He is retained as a photographer by Their Royal Highnesses the Prince of Wales and the Duchess of Cornwall, as well as a number of household-name clients and organisations.
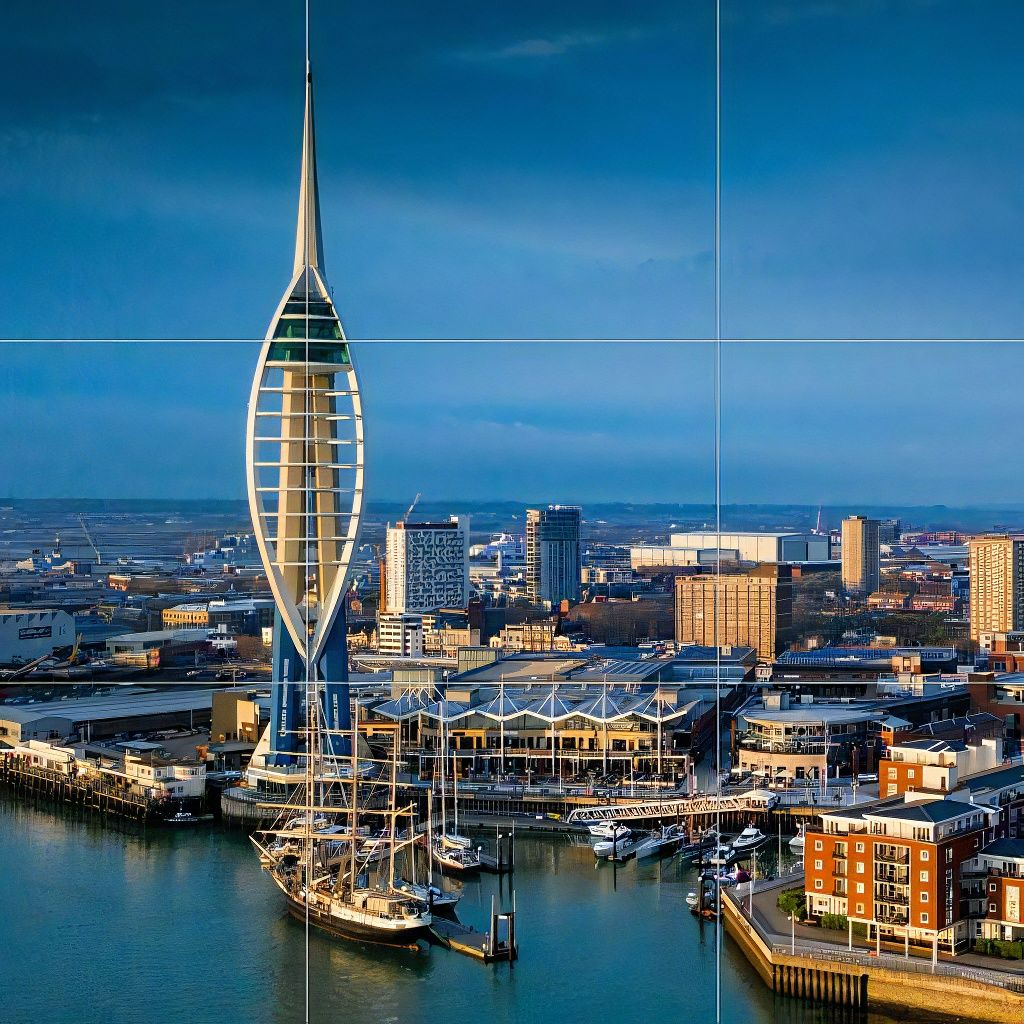 Drone photograph of Spinnaker tower in Portsmouth